Trimming Seam Allowances: 9 Essential Techniques for a Professional Finish
Seams Need to Be Neatened
Long seams such as the side seams of a dress, sleeves seams and even the waist seams do not usually need to be trimmed but they will usually need to have the edges neatened to prevent fraying. There are several ways to neaten these such as:
Using an overlocker (serger) to neaten the edges.
Enclosing the edge in bias binding.
Sew a zig zag stitch along each edge of the seam.
Use pinking shears that will make the edge zig zag shaped and less prone to fraying.
Trimming Seam Allowances for a Professional Finish
Trimming seam allowances is one of those small sewing steps that makes a huge difference to how your finished garment looks and feels. It reduces bulk, helps seams lie flat, and prevents ridges showing through on the right side — especially around curves like necklines and armholes.
If you’ve ever turned a garment right side out and thought “why won’t this sit nicely?”, trimming seam allowances is often the missing step.
Let’s break it down simply.
What Does Trimming Seam Allowance Mean?
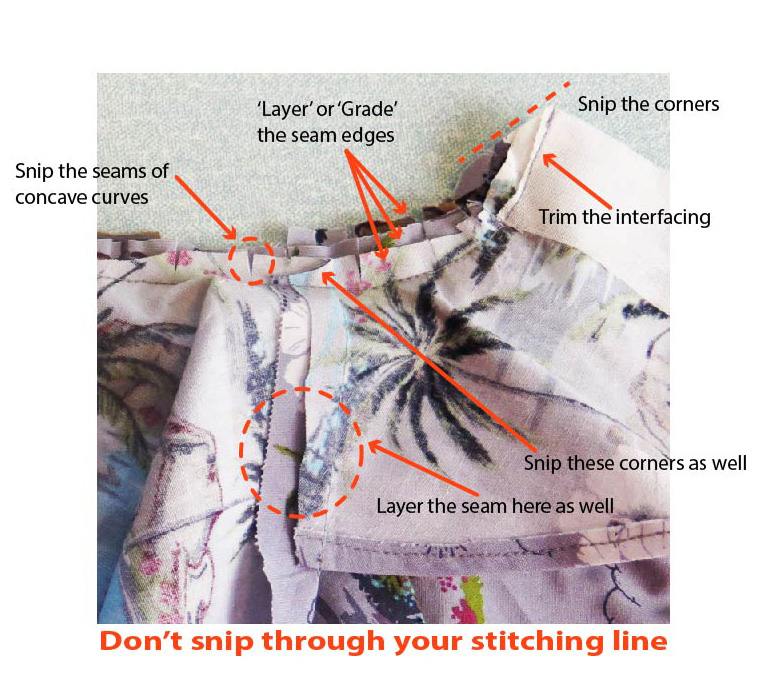
Trimming seam allowance means cutting away excess fabric from a sewn seam. Usually only one layer of the seam is trimmed. This is also called ‘grading’ or ‘layering’.
Most patterns use a standard seam allowance (often ⅝” / 1.5cm), but you often don’t need (or want) all that fabric on both sides of the seam allowance once the seam is sewn.
By trimming it down, you:
Reduce bulk
Improve comfort (important for children and sensory-sensitive wearers)
Help seams sit smoothly
Create a more professional finish
Grading Seam Allowances to Reduce Bulk
Grading / Layering means trimming each layer of fabric to a different width.
This is especially useful when sewing:
Facings
Waistbands
Collars
Linings
How to grade:
Leave the layer closest to the outer fabric the widest
Trim the layers underneath progressively narrower
This prevents a thick ridge forming and helps the seam lie flat and keeps the edges crisp.
Important points to remember are:
Don’t cut through the stitching line.
Don’t trim so close to the stitching line that the garment loses its strength.
If the fabric is a very loose weave trim even less.
If a seam will be under a lot of strain, double stitch along the stitching line to add strength. E.g the crotch seam on trousers.
Cut away all excess fabric to reduce bulk.
Trim interfacing right up to the stitching line.
Cutting Corners
Once you have trimmed the seam allowances of the parts of the project that will be enclosed such as collars and cuffs, waistband and facings etc, you will then need to snip off the seam allowance at the corners. As below:
Clip Inner Curves
Inner curves (like necklines) need space to spread.
Make small straight cuts into the seam allowance, stopping just before the stitching line.
This allows the fabric to open out smoothly when turned.
Notch Outer Curves
Outer curves (like princess seams or curved edges) need fabric removed in order to lay flat.
Cut out small V-shaped notches from the seam allowance to remove excess bulk.
Press Before and After Trimming
Light pressing before trimming seam allowances can help you see where bulk is forming.
Always give the seam a final press after trimming — pressing sets the seam and improves the finish instantly.
Use the Right Scissors
Small, sharp scissors give you control and accuracy.
Best options:
Embroidery scissors
Duckbill scissors (great for grading without cutting the main fabric)
Avoid large dressmaking shears for detailed trimming.
Amazon sell a range of duckbill scissors see HERE. (not an affiliate)
Below is an Example of Trimming the Neck Edge of a Hawaiian Shirt.
The Hawaiian Shirt Pattern can be found HERE For children ages 3 – 10 years , it is super soft with no internal seams, so great for sensory kids.